stefanhinz
- Registriert
- 29.12.09
- Beiträge
- 109
- Reaktionen
- 25
- Punkte
- 216
Hallo allerseits,
seit Weihnachten (der Weihnachtsmann brachte mein neues Akai MPK 261) habe ich eine Menge Zeit damit verbracht, mich in die Fernsteuerung von Cubase mittels Masterkeyboard mit den entsprechenden Buttons, Fadern usw. einzuarbeiten.
Dokumentation hierzu ist mehr als spärlich, und in diversen Foren und sonstigen Fundstellen im Netz scheint überwiegend davon ausgegangen zu werden, dass man mit eingebauter MIDI-Schnittstelle im Hirn geboren wurde. Ich habe mir den Kram also Stück für Stück zusammengereimt und bin jetzt in der Lage, Cubase mittels MPK 261 so fernzusteuern, wie ich mir das vorstelle. Über meine Erkenntnisse habe ich einen üppig bebilderten Artikel geschrieben:
https://sedgemusic.wordpress.com/2015/01/31/remote-controlling-cubase-part-1/
Der Artikel ist auf Englisch (mit deutschen Bildschirmfotos ), ich hoffe, das ist kein Problem. Ich habe ihn auch hierhin kopiert.
Cheers,
Stefan
----
So I’ve spent a lot of time figuring out how to control Cubase with my new Akai MPK 261. Documentation is sparse, both for Cubase and for the Akai, and on the Net, everybody seems to assume you’ve been born with the basic knowledge of MIDI and how this relates to remote controlling a DAW (digital audio workstation).
In this article, I’m going to demonstrate how I set up my device (MPK 261) to control my DAW (Cubase). However, the illustrated concepts should apply to any device (by Steinberg, Novation, or whatever brand or model you prefer), and probably to most DAWs out there, for example Logic. Also, I configured things on Windows 7, but the operating system could be OS X or Linux as well. If you find that’s not true, and things work completely differently with other devices, other DAWs, or on other operating systems, please leave a comment!
First, what’s the point of remote controlling Cubase? There’s only one reason, if you ask me, and that’s to reduce the need to switch between (piano) keyboard and keyboard/mouse all the time. Also, using hardware knobs and faders instead of those you’d operate with the mouse may help you focus on the music rather than on technical operations. Have a look at how the Akai MPK 261 looks like — the smaller MPK 249 has the exact same features, and the even the “baby brother”, the MPK 225, has many of those features. And since I’m not an Akai sales person, the device of your choice likely has very similar features.

On the left side, it’s got 5 buttons labeled DAW CONTROL. They’re actually generic buttons, doing what the arrow keys on your keyboard do, and the middle button is a select button, doing what you’d do by pointing and clicking with the mouse (selecting an item).
In the middle, the MPK has transport buttons for the DAW (rewind, forward, stop, play, record). On the right side, it has 8 knobs (K1 through K8), 8 faders (F1 through F8), and 8 switches (S1 through S8). Left to that array (below the stop and play transport buttons), note the CONTROL BANK buttons labeled A, B, and C. They allow for using the knobs, faders and switches for 3 different scenarios. In the end, this gives you 3 x 8 = 24 knobs, faders, and switches. In Cubase, you’ll see that the knobs are labeled K1 through K24, and likewise for the faders and switches (F1 through F24, S1 through S24). K9 in Cubase is actually Bank B + K1 on the device, and K17 in Cubase is Bank C + K1 on the device. I guess you can figure out the rest yourself.
How do you connect the MPK to Cubase? Here’s how I did it:
Plug a USB cable in the MPK and in the computer that’s running Cubase.
When the (Windows) computer is turned on, it automatically sets up the MPK as a USB device.
In Cubase, select Devices > Device Setup (Geräte > Geräte konfigurieren).
In the window that comes up, click the + (plus) sign in the upper left corner.
If you’re lucky, you’ll find your device listed (for example Mackie Control or Steinberg Houston). If not, select Generic Remote (Generischer Controller).
This will add another device under Remote Control Devices (Fernbedienungsgeräte) on the left side of the window. If you’ve selected Generic Controller, the new device is named Generic Controller (d’uh!). Unfortunately, there’s no way to rename it (I’d obviously want to rename it to MPK 261).
Select Generic Controller. On the right side, set the MIDI Input and MIDI Output to your device (in my case, MPK261).
The result of this is shown in the screenshot:

Careful! Other software might automatically set up additional remote controllers in Cubase. In my case, I think that was Akai’s MPC Essentials Software that was shipped with the device. It registered itself as Generic Controller, and moved my original settings to Generic Controller 2. Okay, no desaster, but it also set the MIDI Input and MIDI Output to MPK261. So I ended up with two generic controllers, both assigned to the MPK. That caused all kinds of fancy problems — for example, I’d turn a knob in a VST synthesizer, and the volume of a track would increase or decrease at the same time.
Lesson learned: Make sure there’s only one (generic) controller assigned to your device in the MIDI Input and MIDI output fields.
If you don’t want to remove the other generic controllers you might see, make sure they’re not assigned to your device. As the screenshot shows, I’ve set MIDI Input and MIDI Output to Not Connected (Nicht verbunden) for that other generic controller.

On the right side of the window (we’ll stay in the window that opens with Devices > Device Setup for the rest of this article), below the MIDI Input and MIDI Output fields, there are two panes. We’ll first look at the upper pane.
The upper pane shows, under Control Item (Steuerelement), all available buttons, faders, and switches of your device. For the Akai MPK261, that’s K1…K24, F1…F24, S1…S24, and 5 transport buttons (Stop, Play, Record, Rewind, FastForward). In the MIDI Status column, they’re likely all set to Controller. The Max Value column values will likely all be 127 (the MIDI maximum value), and the Flags column will have E (Empfangen) or whatever stands for Receive in your language.

Now for the most interesting columns, MIDI Channel (MIDI-Kanal) and Address. In the screenshot, knob K1 is highlighted. You can see that K1 sends on MIDI channel 1 and with the address of 10. But how does Cubase know?
There are two answers to that question:
1. The MPK261 is configured to send the K1 signal (precisely, Bank A + K1) on MIDI channel 1 and with a CC number of 010, as can be seen in this photo:

The MPK comes up a so called preset that has useful MIDI channel + CC number combinations for all buttons, faders, and knobs. You can edit that preset by pressing the Edit button below the blue display, then moving the knob, fader, switch, or button whose settings you’d like to view or change. In the photo, K1 (Cubase) is labeled Knob01, MIDI channel 1 (Cubase) is labeled MIDIChannel: USB A1, and the Cubase address of 10 is labeled CC Number: 010.
The combination of MIDI channel + CC number must be unique for each control element, and in the MPK preset named “Cubase”, they’re all unique. Great.
2. So that Cubase knows about these settings, you need to configure them in the Devices > Device Setup window. For all those knobs and buttons, that can be a lot of work, like this:
On the device, see what the settings for K1 are (MIDI channel USB A1, CC number 010).
In Cubase, select K1, and set the MIDI channel to 1, and the address to 10.
Do likewise for all other control elements of your device.
Fortunately, Akai provides a file that contains configuration settings for Cubase. You can download it here. It’s an XML file which I’ll look at in detail in part 2 of this article.
Save the XML file in an arbitrary place on your computer, then click the Import button in Cubase. Navigate to where you saved the XML file, and select it. Now, magically all the control items will be assigned a MIDI channel and an address.
When done, you can safely ignore the upper pane for the rest of your musical life. That pane is just about mapping your device’s MIDI channel + CC number to Cubase’s MIDI channel + address, and this needs to be set up only once for your device.
All the really interesting things happen in the lower pane. It is about what those knobs, faders, switches, and buttons actually do.
Here is how the lower pane looks after importing the XML file mentioned above:
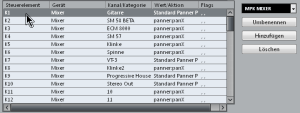
The Control Item (Steuerelement) column contains the exact same elements as the upper pane. That’s no surprise: The upper pane maps the items of your (physical) device to the items in Cubase, and the lower pane assigns actions to the items in Cubase.
The Device (Gerät) column shows that all “devices” are set to Mixer. What else could you set them to? Well, just click on Mixer, and a list comes up that shows other options, like Not assigned (Nicht zugewiesen), Command (Befehl), and others:
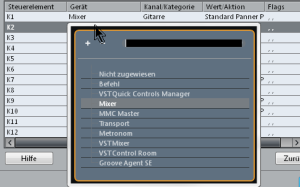
We’ll get to those, particularly to Command (Befehl), later on.
The next column is Channel/Category (Kanal/Kategorie). This is a subcategory of the previous column, in our case, Mixer. In other words, since the Device column is set to Mixer, you can only select subcategories of Mixer in the Channel/Category column. If it was set to Command (Befehl), you’d get different subcategories to choose from.
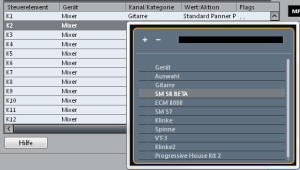
Again, to change the value from Gitarre (guitar) to something else, just click on the value, and a list of values to choose from will appear. Unsurprisingly, Mixer in the Device (Gerät) column means that available options in the Channel/Category (Kanal/Kategorie) column are available input and track channels — the ones you’ll find in the Cubase Mixer. Mine will likely differ from yours.
The last column of interest is Value/Action (Wert/Aktion). This is a subcategory of Channel/Category, and a subsubcategory of Device. This means that the available options depend on what’s set in the Channel/Category column.
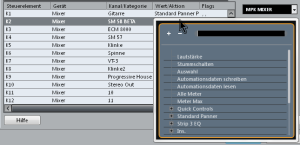
It took me a while to understand that the settings coded in the XML file provided by Akai were all about using the MPK261 as a mixer. That’s not bad per se, but it’s not among the most pressing things I care about. It’s all about mixing, but before any mixing, what I use Cubase for is recording. And there’s no recording support provided by Akai’s XML file. Bummer. But we’ll fix that.
But wait — there’s this select box next to the lower pane. What is it for?
It looks like it contains presets for the lower pane, that is, for the actions that will, after all, be performed when I turn the knobs and move the faders. Selecting SPECTOR gives me this picture:
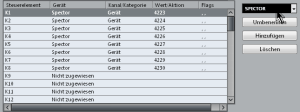
As you can see, it configured K1 through K8 for the Spector VST synthesizer; K9 and the rest of the knobs are not assigned (nicht zugewiesen). Turning K1 or K2 will do something, but turning K9 or K10 will do nothing when the SPECTOR preset has been selected.
As for the values in the Value/Action (Wert/Aktion) column, I have no idea, but I’ll learn what they’re about, how to assign them in a way more sophisticated than by pure number guessing, and will likely blog about it as part 3 or 4 of this article.
It’s nice to be able to have multiple presets, but how do you make use of them in Cubase after having configured them?
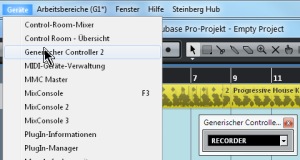
Once the configuration is done and the Devices > Device Setup window is closed, select the Generic Remote (Generischer Controller) for your device (in my case, that’s Generischer Controller 2) from the Devices menu. This will open a tiny window that stays open until you close it — it’s persistent across Cubase sessions. In that window, you switch between the available presets configured in the Device > Device Setup window.
At this point, you can guess how excited I got about being able to configure presets for anything I’d do in Cubase. A preset for audio recording, a preset for VST recording, a preset for mixing, a preset for mastering, and of course one preset per favorite VST instrument. I’ve yet to get there, but now that I know how to do it, I’m happy already.
But back to the Devices > Device Setup window.
Since Akai forgot to provide a useful preset for recording, let’s create one. Next to the lower pane, there’s an Add (Hinzufügen) button. When pressed, it adds a new preset labeled Unnamed (Unbenannt).
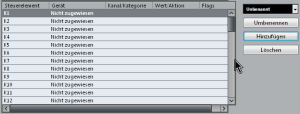
Pressing the Rename (Umbenennen) button allows for renaming — I’ll call it RECORDER.

The third button, Delete (Löschen), removes the selected preset. I found that it doesn’t work reliably — removed presets keep coming back. We’ll fix that in part 2 of this article, by tampering with the XML file that stores presets.
For now, these are the available presets:
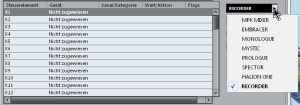
Unfortunately, there seems to be no way of reordering them. In the select field, they’ll appear in the order they were created.
You’ve probably noticed that none of the knobs are assigned for the new RECORDER preset. So let me show you how to assign two elements, F1 and F2 (the first two faders selected via BANK A).
Here’s how this looks initially:

Click on Unassigned (Nicht zugewiesen) in the F1 row. A list comes up. The most useful options to select from that I’ve found so far are:
Command (Befehl)
Mixer
Transport
The Command (Befehl) “device” (main category, actually) has by far the largest set of options to choose from. So let’s select Command.

Now the F1 row looks like this:

Next, let’s set the Channel/Category (Kanal/Kategorie) value. I want fader 1 to zoom in, so I select Zoom (the search field comes handy when there are many options):

Now the F1 row looks like this:

In the list that comes up when clicking in the Value/Action (Wert/Aktion) field, I select Zoom in (Vergrößern).
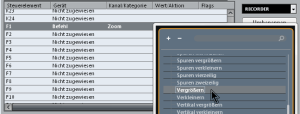
It would certainly be nice to have just one fader that zooms in and zooms out, depending on which direction I move it in. I don’t think that’s possible, though, because, after all, this is MIDI, which generally means “1 device element => 1 action”. So, I will need one fader to zoom in, and one to zoom out.
After I’ve configured F1 to zoom in, I’ll configured F2 to zoom out, in the exact same way described above, except obviously for the last step, where I select Zoom Out (Verkleinern).

That’s it. I’ll leave it as an exercise to you to set up the rest of the elements. And when I’m done with that myself, I’ll publish an XML file containing my settings.
Once you click Apply (Übernehmen), you can immediately try out your settings, without having to close the Devices > Device Setup window. That’s handy for playing around and debugging.
Clicking OK will close the window. But wait!
The settings you’ve made are persistent as soon as you click Apply, but will they persist a Cubase crash, or even a regular restart? So far, I’ve been lucky here, but better safe than sorry, so let’s save them in an XML file. This is done by clicking the Export (Exportieren) button:
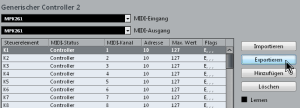
In the file saving dialog, choose a location and enter a file name. I’ve simply selected the Akai XML file, suffixed by STEFAN. A better name would probably be MyMPK.xml or something like that.
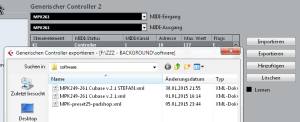
Now, in case havoc happens, or in case I screw up the setting so badly that I’d rather start over again, I can simply import that file with the Import (Importieren) button. That import would override any settings I’ve made in the interface.
In part 2 of this article, we’ll have a look at how that XML file is organized, and how to use an editor to create or modify settings by directly editing the XML.
In case you find any glaring mistakes or omissions in this article, or if you know of ways to make things easier or more straightforward, please leave a comment!
Hope this will save newbies like me some time and frustration getting going with Cubase remote control.
seit Weihnachten (der Weihnachtsmann brachte mein neues Akai MPK 261) habe ich eine Menge Zeit damit verbracht, mich in die Fernsteuerung von Cubase mittels Masterkeyboard mit den entsprechenden Buttons, Fadern usw. einzuarbeiten.
Dokumentation hierzu ist mehr als spärlich, und in diversen Foren und sonstigen Fundstellen im Netz scheint überwiegend davon ausgegangen zu werden, dass man mit eingebauter MIDI-Schnittstelle im Hirn geboren wurde. Ich habe mir den Kram also Stück für Stück zusammengereimt und bin jetzt in der Lage, Cubase mittels MPK 261 so fernzusteuern, wie ich mir das vorstelle. Über meine Erkenntnisse habe ich einen üppig bebilderten Artikel geschrieben:
https://sedgemusic.wordpress.com/2015/01/31/remote-controlling-cubase-part-1/
Der Artikel ist auf Englisch (mit deutschen Bildschirmfotos
Cheers,
Stefan
----
So I’ve spent a lot of time figuring out how to control Cubase with my new Akai MPK 261. Documentation is sparse, both for Cubase and for the Akai, and on the Net, everybody seems to assume you’ve been born with the basic knowledge of MIDI and how this relates to remote controlling a DAW (digital audio workstation).
In this article, I’m going to demonstrate how I set up my device (MPK 261) to control my DAW (Cubase). However, the illustrated concepts should apply to any device (by Steinberg, Novation, or whatever brand or model you prefer), and probably to most DAWs out there, for example Logic. Also, I configured things on Windows 7, but the operating system could be OS X or Linux as well. If you find that’s not true, and things work completely differently with other devices, other DAWs, or on other operating systems, please leave a comment!
First, what’s the point of remote controlling Cubase? There’s only one reason, if you ask me, and that’s to reduce the need to switch between (piano) keyboard and keyboard/mouse all the time. Also, using hardware knobs and faders instead of those you’d operate with the mouse may help you focus on the music rather than on technical operations. Have a look at how the Akai MPK 261 looks like — the smaller MPK 249 has the exact same features, and the even the “baby brother”, the MPK 225, has many of those features. And since I’m not an Akai sales person, the device of your choice likely has very similar features.

On the left side, it’s got 5 buttons labeled DAW CONTROL. They’re actually generic buttons, doing what the arrow keys on your keyboard do, and the middle button is a select button, doing what you’d do by pointing and clicking with the mouse (selecting an item).
In the middle, the MPK has transport buttons for the DAW (rewind, forward, stop, play, record). On the right side, it has 8 knobs (K1 through K8), 8 faders (F1 through F8), and 8 switches (S1 through S8). Left to that array (below the stop and play transport buttons), note the CONTROL BANK buttons labeled A, B, and C. They allow for using the knobs, faders and switches for 3 different scenarios. In the end, this gives you 3 x 8 = 24 knobs, faders, and switches. In Cubase, you’ll see that the knobs are labeled K1 through K24, and likewise for the faders and switches (F1 through F24, S1 through S24). K9 in Cubase is actually Bank B + K1 on the device, and K17 in Cubase is Bank C + K1 on the device. I guess you can figure out the rest yourself.
How do you connect the MPK to Cubase? Here’s how I did it:
Plug a USB cable in the MPK and in the computer that’s running Cubase.
When the (Windows) computer is turned on, it automatically sets up the MPK as a USB device.
In Cubase, select Devices > Device Setup (Geräte > Geräte konfigurieren).
In the window that comes up, click the + (plus) sign in the upper left corner.
If you’re lucky, you’ll find your device listed (for example Mackie Control or Steinberg Houston). If not, select Generic Remote (Generischer Controller).
This will add another device under Remote Control Devices (Fernbedienungsgeräte) on the left side of the window. If you’ve selected Generic Controller, the new device is named Generic Controller (d’uh!). Unfortunately, there’s no way to rename it (I’d obviously want to rename it to MPK 261).
Select Generic Controller. On the right side, set the MIDI Input and MIDI Output to your device (in my case, MPK261).
The result of this is shown in the screenshot:

Careful! Other software might automatically set up additional remote controllers in Cubase. In my case, I think that was Akai’s MPC Essentials Software that was shipped with the device. It registered itself as Generic Controller, and moved my original settings to Generic Controller 2. Okay, no desaster, but it also set the MIDI Input and MIDI Output to MPK261. So I ended up with two generic controllers, both assigned to the MPK. That caused all kinds of fancy problems — for example, I’d turn a knob in a VST synthesizer, and the volume of a track would increase or decrease at the same time.
Lesson learned: Make sure there’s only one (generic) controller assigned to your device in the MIDI Input and MIDI output fields.
If you don’t want to remove the other generic controllers you might see, make sure they’re not assigned to your device. As the screenshot shows, I’ve set MIDI Input and MIDI Output to Not Connected (Nicht verbunden) for that other generic controller.

On the right side of the window (we’ll stay in the window that opens with Devices > Device Setup for the rest of this article), below the MIDI Input and MIDI Output fields, there are two panes. We’ll first look at the upper pane.
The upper pane shows, under Control Item (Steuerelement), all available buttons, faders, and switches of your device. For the Akai MPK261, that’s K1…K24, F1…F24, S1…S24, and 5 transport buttons (Stop, Play, Record, Rewind, FastForward). In the MIDI Status column, they’re likely all set to Controller. The Max Value column values will likely all be 127 (the MIDI maximum value), and the Flags column will have E (Empfangen) or whatever stands for Receive in your language.

Now for the most interesting columns, MIDI Channel (MIDI-Kanal) and Address. In the screenshot, knob K1 is highlighted. You can see that K1 sends on MIDI channel 1 and with the address of 10. But how does Cubase know?
There are two answers to that question:
1. The MPK261 is configured to send the K1 signal (precisely, Bank A + K1) on MIDI channel 1 and with a CC number of 010, as can be seen in this photo:

The MPK comes up a so called preset that has useful MIDI channel + CC number combinations for all buttons, faders, and knobs. You can edit that preset by pressing the Edit button below the blue display, then moving the knob, fader, switch, or button whose settings you’d like to view or change. In the photo, K1 (Cubase) is labeled Knob01, MIDI channel 1 (Cubase) is labeled MIDIChannel: USB A1, and the Cubase address of 10 is labeled CC Number: 010.
The combination of MIDI channel + CC number must be unique for each control element, and in the MPK preset named “Cubase”, they’re all unique. Great.
2. So that Cubase knows about these settings, you need to configure them in the Devices > Device Setup window. For all those knobs and buttons, that can be a lot of work, like this:
On the device, see what the settings for K1 are (MIDI channel USB A1, CC number 010).
In Cubase, select K1, and set the MIDI channel to 1, and the address to 10.
Do likewise for all other control elements of your device.
Fortunately, Akai provides a file that contains configuration settings for Cubase. You can download it here. It’s an XML file which I’ll look at in detail in part 2 of this article.
Save the XML file in an arbitrary place on your computer, then click the Import button in Cubase. Navigate to where you saved the XML file, and select it. Now, magically all the control items will be assigned a MIDI channel and an address.
When done, you can safely ignore the upper pane for the rest of your musical life.
All the really interesting things happen in the lower pane. It is about what those knobs, faders, switches, and buttons actually do.
Here is how the lower pane looks after importing the XML file mentioned above:

The Control Item (Steuerelement) column contains the exact same elements as the upper pane. That’s no surprise: The upper pane maps the items of your (physical) device to the items in Cubase, and the lower pane assigns actions to the items in Cubase.
The Device (Gerät) column shows that all “devices” are set to Mixer. What else could you set them to? Well, just click on Mixer, and a list comes up that shows other options, like Not assigned (Nicht zugewiesen), Command (Befehl), and others:

We’ll get to those, particularly to Command (Befehl), later on.
The next column is Channel/Category (Kanal/Kategorie). This is a subcategory of the previous column, in our case, Mixer. In other words, since the Device column is set to Mixer, you can only select subcategories of Mixer in the Channel/Category column. If it was set to Command (Befehl), you’d get different subcategories to choose from.

Again, to change the value from Gitarre (guitar) to something else, just click on the value, and a list of values to choose from will appear. Unsurprisingly, Mixer in the Device (Gerät) column means that available options in the Channel/Category (Kanal/Kategorie) column are available input and track channels — the ones you’ll find in the Cubase Mixer. Mine will likely differ from yours.
The last column of interest is Value/Action (Wert/Aktion). This is a subcategory of Channel/Category, and a subsubcategory of Device. This means that the available options depend on what’s set in the Channel/Category column.

It took me a while to understand that the settings coded in the XML file provided by Akai were all about using the MPK261 as a mixer. That’s not bad per se, but it’s not among the most pressing things I care about. It’s all about mixing, but before any mixing, what I use Cubase for is recording. And there’s no recording support provided by Akai’s XML file. Bummer. But we’ll fix that.
But wait — there’s this select box next to the lower pane. What is it for?
It looks like it contains presets for the lower pane, that is, for the actions that will, after all, be performed when I turn the knobs and move the faders. Selecting SPECTOR gives me this picture:

As you can see, it configured K1 through K8 for the Spector VST synthesizer; K9 and the rest of the knobs are not assigned (nicht zugewiesen). Turning K1 or K2 will do something, but turning K9 or K10 will do nothing when the SPECTOR preset has been selected.
As for the values in the Value/Action (Wert/Aktion) column, I have no idea, but I’ll learn what they’re about, how to assign them in a way more sophisticated than by pure number guessing, and will likely blog about it as part 3 or 4 of this article.
It’s nice to be able to have multiple presets, but how do you make use of them in Cubase after having configured them?
Once the configuration is done and the Devices > Device Setup window is closed, select the Generic Remote (Generischer Controller) for your device (in my case, that’s Generischer Controller 2) from the Devices menu. This will open a tiny window that stays open until you close it — it’s persistent across Cubase sessions. In that window, you switch between the available presets configured in the Device > Device Setup window.

At this point, you can guess how excited I got about being able to configure presets for anything I’d do in Cubase. A preset for audio recording, a preset for VST recording, a preset for mixing, a preset for mastering, and of course one preset per favorite VST instrument. I’ve yet to get there, but now that I know how to do it, I’m happy already.
But back to the Devices > Device Setup window.
Since Akai forgot to provide a useful preset for recording, let’s create one. Next to the lower pane, there’s an Add (Hinzufügen) button. When pressed, it adds a new preset labeled Unnamed (Unbenannt).

Pressing the Rename (Umbenennen) button allows for renaming — I’ll call it RECORDER.

The third button, Delete (Löschen), removes the selected preset. I found that it doesn’t work reliably — removed presets keep coming back. We’ll fix that in part 2 of this article, by tampering with the XML file that stores presets.
For now, these are the available presets:

Unfortunately, there seems to be no way of reordering them. In the select field, they’ll appear in the order they were created.
You’ve probably noticed that none of the knobs are assigned for the new RECORDER preset. So let me show you how to assign two elements, F1 and F2 (the first two faders selected via BANK A).
Here’s how this looks initially:

Click on Unassigned (Nicht zugewiesen) in the F1 row. A list comes up. The most useful options to select from that I’ve found so far are:
Command (Befehl)
Mixer
Transport
The Command (Befehl) “device” (main category, actually) has by far the largest set of options to choose from. So let’s select Command.

Now the F1 row looks like this:

Next, let’s set the Channel/Category (Kanal/Kategorie) value. I want fader 1 to zoom in, so I select Zoom (the search field comes handy when there are many options):

Now the F1 row looks like this:

In the list that comes up when clicking in the Value/Action (Wert/Aktion) field, I select Zoom in (Vergrößern).

It would certainly be nice to have just one fader that zooms in and zooms out, depending on which direction I move it in. I don’t think that’s possible, though, because, after all, this is MIDI, which generally means “1 device element => 1 action”. So, I will need one fader to zoom in, and one to zoom out.
After I’ve configured F1 to zoom in, I’ll configured F2 to zoom out, in the exact same way described above, except obviously for the last step, where I select Zoom Out (Verkleinern).

That’s it. I’ll leave it as an exercise to you to set up the rest of the elements. And when I’m done with that myself, I’ll publish an XML file containing my settings.
Once you click Apply (Übernehmen), you can immediately try out your settings, without having to close the Devices > Device Setup window. That’s handy for playing around and debugging.
Clicking OK will close the window. But wait!
The settings you’ve made are persistent as soon as you click Apply, but will they persist a Cubase crash, or even a regular restart? So far, I’ve been lucky here, but better safe than sorry, so let’s save them in an XML file. This is done by clicking the Export (Exportieren) button:

In the file saving dialog, choose a location and enter a file name. I’ve simply selected the Akai XML file, suffixed by STEFAN. A better name would probably be MyMPK.xml or something like that.

Now, in case havoc happens, or in case I screw up the setting so badly that I’d rather start over again, I can simply import that file with the Import (Importieren) button. That import would override any settings I’ve made in the interface.
In part 2 of this article, we’ll have a look at how that XML file is organized, and how to use an editor to create or modify settings by directly editing the XML.
In case you find any glaring mistakes or omissions in this article, or if you know of ways to make things easier or more straightforward, please leave a comment!
Hope this will save newbies like me some time and frustration getting going with Cubase remote control.